
Sometimes, when trying to open an image with Windows Photo Viewer, Windows Photo Viewer shows the message "Windows Photo Viewer can't display this picture because there might not be enough memory". What causes this is that the image is embedded with ICC profiles. It is sure that you can view the image by opening it with another program like Microsoft Paint, Microsoft Office Picture Manager, or Photos. Today, I want to teach you how to iron out this error so that you can open images with Windows Photo Viewer.
Way 1. Change the device profile of Windows color system
We need to open "Color Management". There are three methods to open it.
- Click on the "Start" button, type color management in the search box, and click on "Color Management".
- Press the Windows + R keys from your keyboard to open the "Run" dialog box. You can also right-click on the "Start" button and select "Run". Type colorcpl and press the "Enter" key.
- Click on the "Start" button, type control panel in the search box, and click on "Control Panel". Choose "Large icons" from the "View by" drop-down menu and you will see the "Color Management" utility. Click on it to access it. You can also type color management in the search box of "Control Panel", press the "Enter" key, and click on the "Color Management" search result.
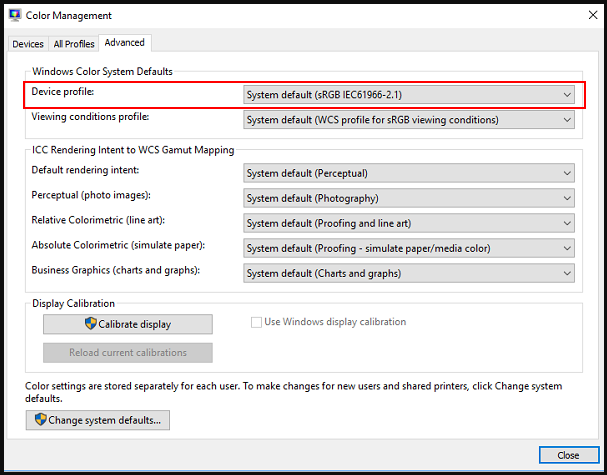
Click on the "Advanced" tab in "Color Management". As you can see, the device profile is set to "System default (sRGB IEC61966-2.1)". Click on the "Device profile" drop-down menu in the "Windows Color System Defaults" section and choose "Agfa: Swop Standard". Generally speaking, now, you can open the image with Windows Photo Viewer. If you still can't open the image, close all apps and try it once again. If you still can't open the image, reboot your system and try to open the image.
Please note that changing the default device profile to "Agfa: Swop Standard" will make the print result in white text on a black background. So, if you want to print the image, you need to change "Agfa: Swop Standard" back to "System default (sRGB IEC61966-2.1)". Besides, another side effect is that this way will make colors of some images inverted.
If it is inconvenient for you to perform the steps back and forth, you can modify the settings by importing the needed .reg file to the registry.
Copy and paste the following content to Notepad and save it as a .reg file. You can name it "To view the image.reg". Import it to the registry when you need to view the image in Windows Photo Viewer.
Windows Registry Editor Version 5.00
[HKEY_CURRENT_USER\SOFTWARE\Microsoft\Windows NT\CurrentVersion\ICM\RegisteredProfiles]
"sRGB"=-
Copy and paste the following content to Notepad and save it as a .reg file. You can name it "To print the image normally.reg". Import it to the registry when you need to print the image.
Windows Registry Editor Version 5.00
[HKEY_CURRENT_USER\SOFTWARE\Microsoft\Windows NT\CurrentVersion\ICM\RegisteredProfiles]
"sRGB"="RSWOP.icm"
Way 2. Convert RGB color mode to CMYK color mode in Ps
- Throw the image into Photoshop. Click on "Image". Go to "Mode" and click on "CMYK" mode. A dialog will pop up. Click on "OK" in the dialog.
- Save the changed image.
If there are many images you can't open with Windows Photo Viewer, you can batch process them in Ps. Take this article "How to batch add strokes to images in Photoshop" as reference to learn how to process images in a batch.
Way 3. Remove ICC profiles from images using "Save as" in Ps
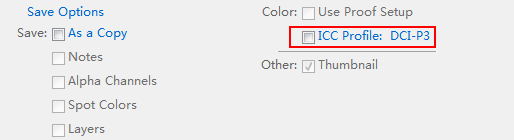
- Drag and drop your image into Photoshop. Click on "File"->"Save as".
- Choose "JPEG" or "PNG" as the output image format in the "Save as" dialog. Go to the "Color:" section on the bottom of the dialog and uncheck the "ICC Profile" saving option. Click on "Save".
Way 4. Convert your JPGs and PNGs using TinyPNG
I introduced TinyPNG as an image compressor in this article "3 reliable online tools to reduce the size of images". It makes WEBP, JPEG, and PNG files much smaller while the compressing effect is nearly invisible. You can use this app to batch convert your images with ICC profiles and get the images that can be opened with Windows Photo Viewer. Drag and drop your images into the workspace. When the conversion is done, you will see a download button. Press the "download" button to get a ZIP archive including converted images.
Way 5. Convert your images using "exiftool.exe"
There is a free command-line tool named "exiftool.exe", which can be used to batch convert your original images to images without ICC profiles. When the process is finished, "_original" will be added to the extensions of all your original images. For example, if your original images are JPGs, their extensions will be renamed to "jpg_original".
- Go to the official site of ExifTool and download the .zip file to your computer.
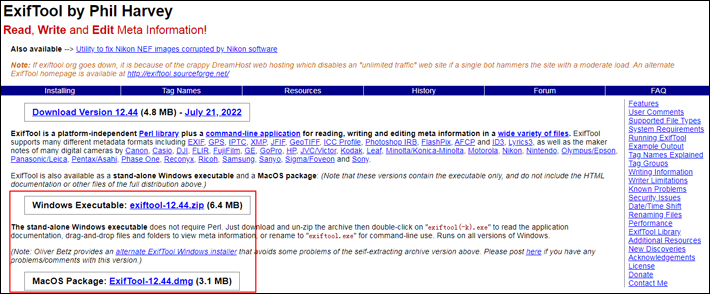
- Extract the stand-alone executable "exiftool(-k).exe" and rename it to "exiftool.exe" for command-line use.
- Make a .bat file. If the original images are JPGs, open Notepad and type exiftool -ICC_Profile= *.jpg. If you want to delete original images of which the extensions are renamed, type another command line del *.jpg_original /s. Save the text file as a .bat file.
exiftool -ICC_Profile= *.jpg
del *.jpg_original /s
- Put the .bat file and the "exiftool.exe" file in the folder where your JPGs are located.
- Run the .bat file to get the JPG images without ICC profiles.
You can also specify the path of a couple of images or one image when using the exiftool -ICC_Profile syntax to create a .bat file. Then, put the .bat file and the "exiftool.exe" in the same folder. Run the .bat file. The following command lines are two examples.
exiftool -ICC_Profile= D:\*.jpg
del D:\*.jpg_original /s
exiftool -ICC_Profile= D:\yourimage.jpg
del D:\yourimage.jpg_original /s
Conclusion
You can't open some images with Windows Photo Viewer and see the error. But it has nothing to do with your available RAM space. It is because of the embedded ICC profiles. The 5 ways mentioned previously help you solve the problem. If you like this tutorial, share it with your friends on Facebook and Twitter.
Recommended Reading
How to delete the blobs.bin file
How to solve "Your clock is ahead"
A thorough solution to stop Windows 10 update services running
How to remove the "DocumentAncestors" metadata