
I believe that a lot of Windows 10 users are discombobulated by 3 Windows 10 update services (Windows Update, Windows Update Medic Service, and Update Orchestrator Service). They do some settings to stop these services from running but these services still run automatically. I also encountered this situation and finally found a solution to stop them running. I have added this solution into part 7 of my previous article "How to disable Windows 10 update thoroughly". In case some old readers don't discover it in that updated article, I want to write this article to show it to them.
Stop Windows update services running by modifying settings in Registry
Right click on the "Windows" icon and select "Run" to open the "Run" command box. Type in regedit and press the "Enter key" to open Registry.
First, we create a value for the keys "wuauserv", "WaaSMedicSVC" and "UsoSvc" respectively.
HKEY_LOCAL_MACHINE\SYSTEM\CurrentControlSet\Services\wuauserv
HKEY_LOCAL_MACHINE\SYSTEM\CurrentControlSet\Services\WaaSMedicSvc
HKEY_LOCAL_MACHINE\SYSTEM\CurrentControlSet\Services\UsoSvc
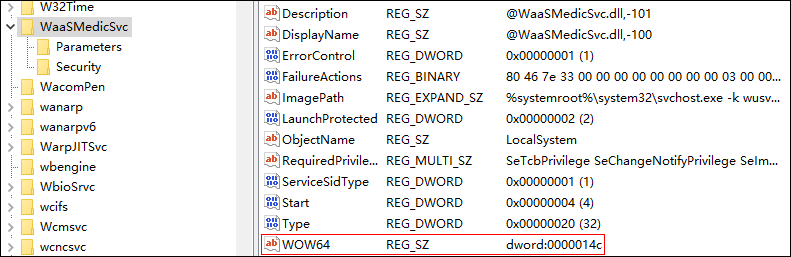
- Locate "wuauserv", the key of "Windows Update".
- Right click on the white space in the right pane. Go to "New" and choose "String Value". Name this created value WOW64. Double-click on the created value and set the value data to dword:0000014c.
- Perform the same actions to "WaaSMedicSvc", the key of Windows Update Medic Service, and "UsoSvc", the key of "Update Orchestrator Service.
Second, we set the "Set Value" permissions to "Deny" for these keys in case the value data you set for the keys are changed by an unknown program of Windows 10 system.
- Right click on "wuauserv" and choose "Permissions".
- Click on "Advanced"->"Add"->"Principal". Type "everyone" in the "Enter the object name to select" box. Click on "Check Names". Click on "OK".
- As you can see, "Allow" is selected. You should ensure no permissions are set to "Allow". Uncheck all permissions for "Allow". Click on "Allow" and choose "Deny". Check the "Set Value" box. Click on "OK" or press the "Enter" key from your keyboard.
- Perform the same actions to the "WaaSMedicSvc", the key of "Windows Update Mediac Service, and "UsoSvc", the key of "Update Orchestrator Service.
Windows update services will no longer start after you make the changes above. If you want to use Windows update in the future, you can undo the changes. By the way, when the "wuauserv" service is stopped. "Windows Store" can't update anything but when the "UsoSvc" service is stopped, "Windows Store" won't be affected.
An alternative solution to stop Windows update services from running
- Press "Win+R" keys and type "regedit" to open the registry editor.
- Locate HKEY_LOCAL_MACHINE\SYSTEM\CurrentControlSet\Services\WaaSMedicSvc\Parameters.
- There are two values, "ServiceDll" and "ServiceMain" in the right pane. Modify the value data of the two values. You can add whatever characters you want to the data. For example, you can change "ServiceMain", the value data of "ServiceMain", to "ServiceMain_disable". You can also rename the "WaaSMedicSvc" key. For example, rename it WaaSMedicSvc.bak. Perform the same actions to the "UsoSvc" key and the "wuauserv" key.

- Locate HKEY_LOCAL_MACHINE\SOFTWARE\Microsoft\Windows NT\CurrentVersion\Svchost\wusvc.
- Rename the "wusvc" key whatever you want. For example, rename it wusvc_disable.
A solution to stop Windows 10 installing updates
I have also found a solution to stop Windows 10 installing updates by modifying the settings in the registry editor.
- Open the registry editor and locate HKEY_LOCAL_MACHINE\SOFTWARE\Policies\Microsoft\Windows\WindowsUpdate.
- If there is not the "WindowsUpdate" key, create it.
- Right-click on the white space in the right pane and create a DWORD (32-bit) value. Name the created value DoNotConnectToWindowsUpdateInternetLocations. Set its value data to 1. Create another DWORD (32-bit) value and name it DisableWindowsUpdateAccess and set its value to 1.
- Create a string value, name it WUServe, and set its value data http://noupdate01.com/. Create another string value, name it WUStatusServer, and set its value data http://noupdate01.com/.
- Go to the left pane and expand the "WindowsUpdate" key and click on the "AU"key.
- Right-click on the white space in the right pane and create a DWORD (32-bit) value. Name it UseWuServer and set its value data to 1.
There is another way to prevent Windows 10 installing updates. That is to modify the file name of "wuaueng.dll". To modify the file name, you need to get the related permission.
- Locate C:\Windows\System32 directory.
- Right click on "wuaueng.dll" and select "Properties". Click on "Securities"->"Advanced". As you can see, the current owner is "TrustedInstaller". You need to change the owner "TrustedInstaller". Click on "Change", type your administrator account name, and click on "OK". Click on "Apply" and you will see a "Windows Security" dialog box. Click on "OK" in this dialog box. Choose the permission entry "Administrators" and click on "Edit". Check the "Full control" box. Click on "OK". Click on "Yes" in the "Windows Security" dialog box.
- Rename the "wuaueng.dll" file.
PS: Delete Windows update services and recover them
If you delete Windows update services, you definitely will stop Windows 10 installing updates. You can delete them temporarily and recover them when you need to install updates. But I don't quite suggest you do this because there is a risk that the services do not work normally after being recovered. If you really want to delete them, follow the steps below.
Delete the "wuauserv" service and recover it
- Locate HKEY_LOCAL_MACHINE\SYSTEM\CurrentControlSet\Services\wuauserv. Right click on "wuauserv" and choose "Export" to save the .reg file. This is backing up the reg file of "wuauserv".
- Right-click on the "Start" menu and choose "Windows PowerShell (Administrator)".
- Type sc.exe stop wuauserv and press the "Enter" key from your keyboard. Then, type sc.exe delete wuauserv. Now, you have deleted the "wuauserv" service.
- To recover the "wuauserv" service, launch "Windows Powershell". Type sc.exe create wuauserv binpath="c:\windows\system32\svchost.exe -k netsvcs -p -s wuauserv" type=share start=auto error=normal tag=no depend=rpcss displayname="Windows Update". Press the "Enter" key from your keyboard. Then, double-click on the .reg file you saved to import it to the registry. Now, you have recovered the "wuauserv" service.
Delete the "WaaSMedicSvc" service and recover it
- Locate HKEY_LOCAL_MACHINE\SYSTEM\CurrentControlSet\Services\WaaSMedicSvc. Right click on "WaaSMedicSvc" and choose "Export" to save the .reg file. This is backing up the reg file of "WaaSMedicSvc".
- Right-click on the "Start" menu and choose "Windows PowerShell (Administrator)".
- Type sc.exe stop WaaSMedicSvc and press the "Enter" key from your keyboard. Then, type sc.exe delete WaaSMedicSvc. Now, you have deleted the "WaaSMedicSvc" service.
- To recover the "WaaSMedicSvc" service, launch "Windows Powershell". Type sc.exe create WaaSMedicSvc binpath="c:\windows\system32\svchost.exe -k netsvcs -p -s WaaSMedicSvc" type=share start=auto error=normal tag=no depend=rpcss displayname="Windows Update Medic Service". Press the "Enter" key from your keyboard. Then, double-click on the .reg file you saved to import it to the registry. Now, you have recovered the "WaaSMedicSvc" service.
Delete the "UsoSvc" service and recover it
- Locate HKEY_LOCAL_MACHINE\SYSTEM\CurrentControlSet\Services\UsoSvc. Right click on "UsoSvc" and choose "Export" to save the .reg file. This is backing up the reg file of "UsoSvc".
- Right-click on the "Start" menu and choose "Windows PowerShell (Administrator)".
- Type sc.exe stop UsoSvc and press the "Enter" key from your keyboard. Then, type sc.exe delete UsoSvc. Now, you have deleted the "UsoSvc" service.
- To recover the "UsoSvc" service, launch "Windows Powershell". Type sc.exe create UsoSvc binpath="c:\windows\system32\svchost.exe -k netsvcs -p -s UsoSvc" type=share start=auto error=normal tag=no depend=rpcss displayname="Update Orchestrator Service". Press the "Enter" key from your keyboard. Then, double-click on the .reg file you saved to import it to the registry. Now, you have recovered the "UsoSvc" service.
Conclusion
Windows 10 auto updating is annoying and brings troubles to our daily uses of computers on many occasions. Sometimes, the updated patches or drivers lead to system error. Sometimes, you are in urgent need of using the computer and the system is rebooted suddenly for configuring updates. Sometimes, you are playing a game and the updating is using too much resources. It is very necessary to stop Windows update services from running when you do not need it. This article helps you make them never run thoroughly. If you like this article, share it with your friends.
Recommended Reading
How to delete the blobs.bin file
How to lower the version of an Android app
How to solve "Your clock is ahead"
How to solve "Windows Photo Viewer can't display this picture"