Automatic updating on Windows 10 is very agonizing. When you are playing a game or doing the paperwork, suddenly the system reboots for the update configuration. You have to wait a long time for its completion. What's more, Windows 10 updates take up much space on your disk C. You don't want any updates but cannot stop Windows updates running. In another word, Microsoft forces the update to take place. I bet with my paycheck that you are incredibly frustrated with this. Don't be worried. This article will guide you how to disable Windows 10 update permanently. Without further ado, let's dive right in.
Part 1. Disable Windows update in Service.msc
Part 2. Disable Windows update service in Registry
Part 3. Disable Windows update in Group Policy
Part 4. Disallow Windows update over a metered connection
Part 5. Disable Windows update in Task Scheduler
Part 6. Create a scheduled task to recover your settings on Windows update
Part 7. Remove every user's access to the "Download" folder
Part 1. Disable Windows update in Service.msc
- Press "Win+R"keys to open the "Run" dialog box. Type "services.msc" and hit "Enter" on the keyboard.
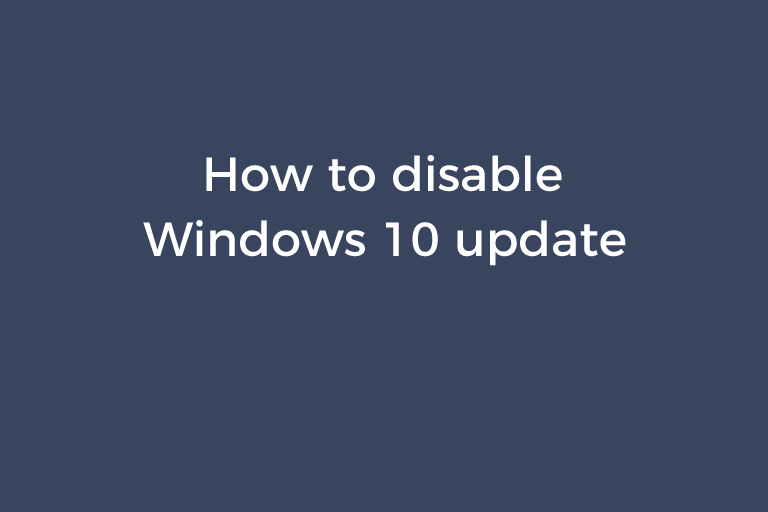
- In the Service window, double click on "Windows Update". Change the "Start type" to "Disabled" on the "General" tab. Click on "Apply".
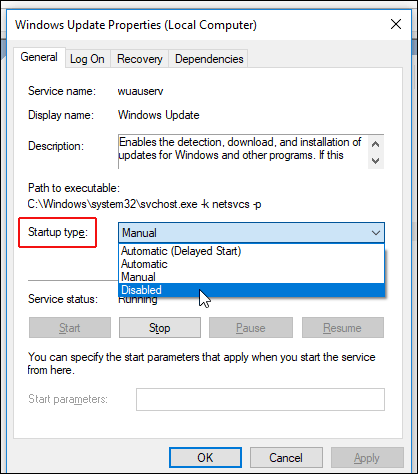
- Go to the "Recovery" tab. Choose "Take No Action" for the options "First failure", "Second failure", and "Subsequent failures". Enter "9999" in the box "Reset fail count after". Click on "Apply". Many people neglect this step but it is very necessary.
Besides "Windows Update", you also should disable "Update Orchestrator Service" and "Windows Update Medic Service". The two services work as bodyguards to protect and fix "Windows Update". You should do the same modifications on "Update Orchestrator Service" and "Windows Update Medic Service". When trying to configure "Windows Update Medic Service, you will see a prompt saying "Access is denied". Please check the solution in "Part 2".
Part 2. Disable Windows update service in Registry
- Right-click on the "Start" button and select "Run". Type "regedit" (without quotes) in the "Run" dialog box and hit the "Enter" key to open the registry editor.
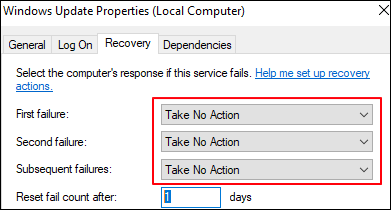
- Follow the path below to navigate to "WaasMedicSvc".
HKEY_LOCAL_MACHINE\SYSTEM\CurrentControlSet\Services\WaaSMedicSvc
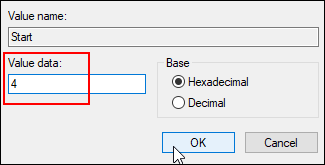
- Double-click on the "Start" value in the right pane.
- Change the value data from "3" to "4". Click on "OK".
- Double-click on another value named "FailureActions" in the right pane.
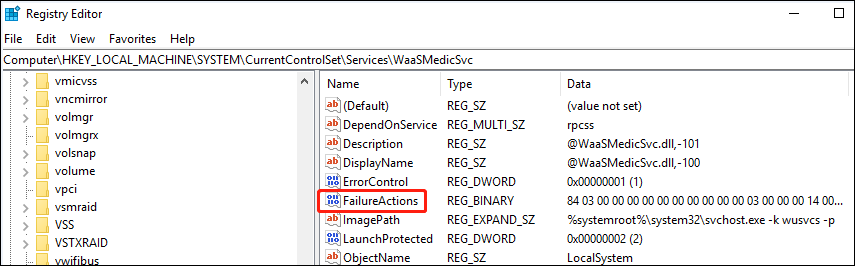
- Go to the fifth row of line "10" and "18" respectively and change "01" to "00".

- Change the value data "84", "03", "00", "00" of the line "00" to "80", "46", "7E", "33".

- It is not very easy to select the value data using the cursor. I do the following steps to select the value data on my computer and you can take it as a reference. Move the mouse cursor to the left side of the value data. Press the right arrow button from your keyboard and the blinking cursor will be placed at the right side of the value data. Move the mouse cursor a little bit afterwards the blinking cursor. Now, drag to select the value data.
After you've modified the value data of "WaaSMedicSvc", check "Windows Update Medic Service" in Services.msc again. You will find the startup type "Manual" has changed to "Disabled". Moreover, "First failure", "Second failure", and "Subsequent failures" are all set as "Take No Action". Besides, the "Reset fail count after" is set to "9999".
Microsoft provides a way to prevent updating Windows 10 systems by creating a registry key. I am not sure if it works but you can give it a try.
- Open the "Start" menu and click on "Settings". Click on "System" and go to "About". Then, you can see your Windows 10 version number, like 1909. Remember this version number.
- Open Registry and go to HKEY_LOCAL_MACHINE/SOFTWARE/Policies/Microsoft/Windows/WindowsUpdate.
- Right-click on "WindowsUpdate" and click on "New"->"DWORD (32-bit) Value" and name the created DWORD (32-bit) value "TargetReleaseVersion". Set the value data to "1".
- Right-click on "Windows Update" and click on "New"->"String Value" and name the created String value "TargetReleaseVersionInfo". Double-click on it, type your Windows version number, and click on "OK".
Part 3. Disable Windows update in Group Policy
- Launch the Run dialog box by pressing the "Win+R" keys
- Enter "gpedit.msc" and click on "OK" to open Group Policy Editor.
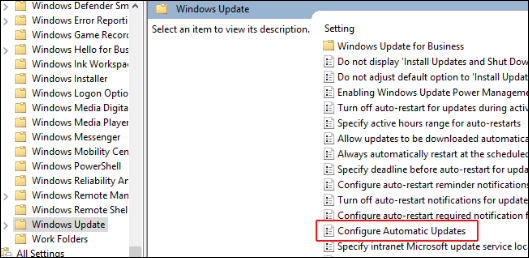
- Go to "Administrative Templates">"Windows components">"Windows update".
- Go to "Configure Automatic Updates" in the right pane and open it.
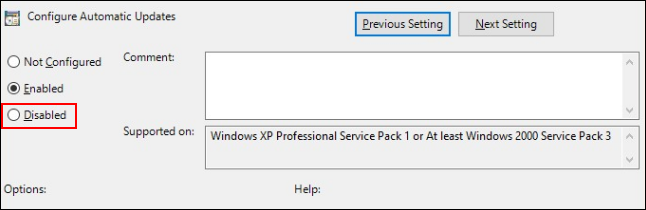
- Select the option "Disabled". Click on "Apply" and "OK".
- Windows Family users don't have access to Group Policy. They can add a value to the registry to tweak this configuration. Open Registry and go to HKEY_LOCAL_MACHINE\SOFTWARE\Policies\Microsoft\Windows. Create a new key under "Windows" and name it "WindowsUpdate". Create a key under "WindowsUpdate" and name it "AU". Click on "AU". Right-click on the white space in the right pane and create a DWORD (32-bit) value for "AU". Name the value "AUOptions". Double-click on this value and set the value data to "2".
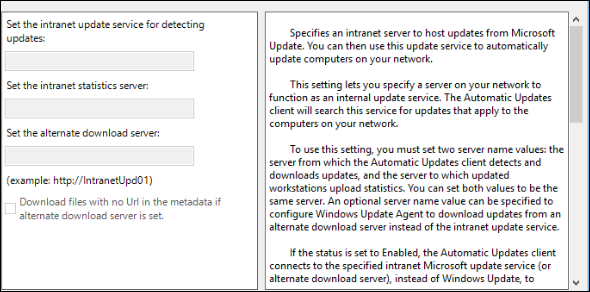
- Open another policy named "Specify Intranet Microsoft update service location".
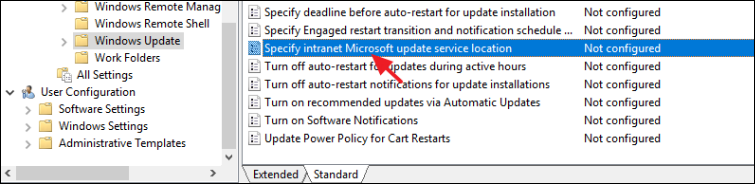
- Choose "Enabled" and type "127.0.0.1" in the first two fields ("Set the intranet update service for detecting updates" & "Set the intranet statistics server"). Click on "Apply" and "OK".
- Open the policy "Do not include drivers with Windows updates". Choose "Enabled" and click on "Apply".
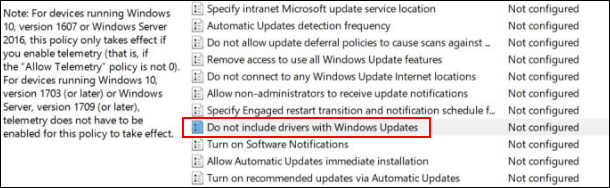
- For Windows Family users, open Registry and go to HKEY_LOCAL_MACHINE\SOFTWARE\Policies\Microsoft\Windows\WindowsUpdate. Right-click on the white space in the right pane and create a DWORD (32-bit) value. Name it "ExcludeWUDriversInQualityUpdate". Double-click on the "ExcludeWUDriversInQualityUpdate" value and change the value data from "0" to "1".
- The last thing we have to configure in Group Policy is the policy "Remove access to use all Windows update features". Open it and select "Enabled".

Part 4. Disallow Windows update over a metered connection
This part is to teach you how to prevent Windows 10 from updating automatically over an internet connection.
- Right-click on "Start" and select "Settings". Or press "Win+I" to open the Windows Settings application.
- Click on "Network & Internet"
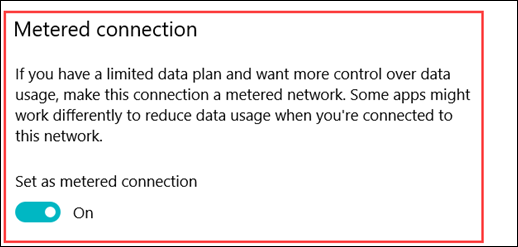
- Click on "Change connection properties.
- Turn on "Set as metered connection".
- Click on "Update & Security" in "Settings".
- Click on "Advanced options".
- Turn off "Download updates over metered connections (extra charge may apply).
- Go back to the "Update & Security" window and click on "Change active hours".
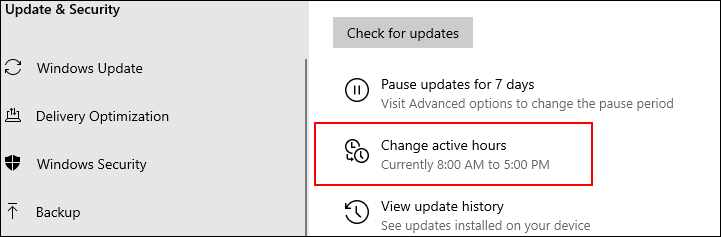
- Windows won't download and install updates during active hours. So, you can set a maximum for the active hours. For example, set 7.00 am as the start time and 1.00 am as the end time.

Part 5. Disable Windows update in Task Scheduler
Perhaps you are not aware that Windows 10 has added a bunch of update scheduled tasks in Task Scheduler.
These scheduled tasks are located at the paths below.
- Task Scheduler Library ->Microsoft -> Windows -> UpdateOrchestrator
- Task Scheduler Library ->Microsoft -> Windows -> WindowsUpdate
- Task Scheduler Library -> Microsoft -> Windows -> WaaSMedic
UpdateOrchestrator
- Schedule Retry Scan
- Schedule Scan
- Backup Scan
- Schedule Scan Static Task
- USO_UxBroker
- Universal Orchestrator Start
- Update Model Task
- Reboot
- Maintenance Install
WindowsUpdate
- Scheduled Start
- sihpostrebook
WaaSmedic
- PerformRemediation
It seems to be very easy to disable these tasks. If you think so, you are a little naive. When trying to disable the update tasks, you may run across one of two situations. A password prompt pops up and asks you for a password for the account S-1-5-18. Or a message shows up and says "The user account you are using does not have permission to disable this task". Besides, you can't delete triggers of each task either. Microsoft uses every trick up its sleeve to prevent you from stopping Windows update. Where there is a problem, there is a solution. Fortunately, we have PsExec that helps you acquire the access to disable the update tasks.
PsExec is one command-line tool of the PsTools suite. It allows you to execute processes remotely.
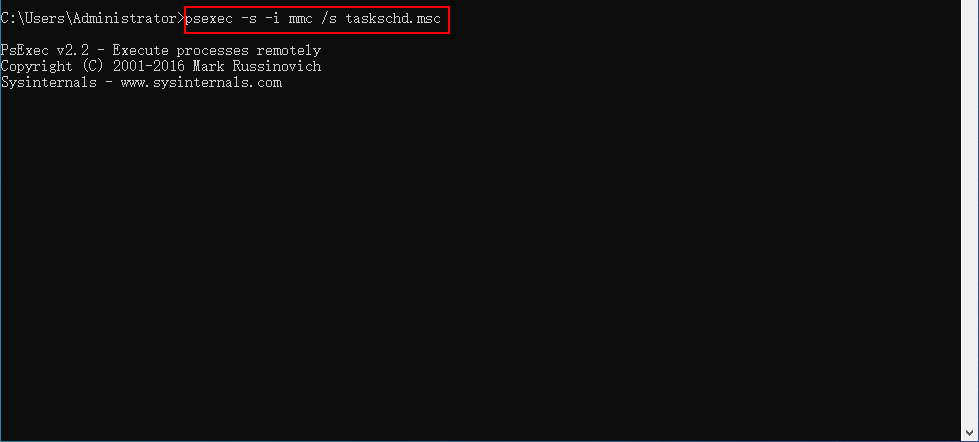
- Download PsExec.exe and place it at the location "C:\Windows\System32\".
![]()
- Fire up CMD as the administrator and type "psexec s -i mmc /s taskschd.msc".
- Task Scheduler will be opened. Navigate to the folder mentioned above and disable the scheduled tasks in the right pane. You can also remove the triggers.
Note: When your system is 64 bit, in case PsExec.exe doesn't work on your system, download PsExec.64, place it to the location "C:\Windows\SysWOW64" and use the command "psexec64 s -i mmc /s taskschd.msc".
![]()
You may think the guide ends here but actually it does not. For some Win 10 versions, there is a "steathy" task. This stealthy task randomly and silently re-enables Windows 10 update, which means all your efforts become in vain. It returns your settings on Windows update in Services, Registry, and Task Scheduler to its original status. If this happens to you, make a bat file and create a scheduled task to beat the stealthy task at its own game. The custom scheduled task will recover your settings as soon as they are changed.
Part 6. Create a scheduled task to recover your settings on Windows update
Step 1. Make a bat file
- Put "PsExec.exe" in the "system32" folder.
- Copy the text below into a notebook and save it. Change the file extension "txt" to "bat".
REG add "HKEY_LOCAL_MACHINE\SYSTEM\CurrentControlSet\Services\UsoSvc" /v "Start" /t REG_DWORD /d "4" /f
REG add "HKEY_LOCAL_MACHINE\SYSTEM\CurrentControlSet\Services\WaaSMedicSvc" /v "Start" /t REG_DWORD /d "4" /f
REG add "HKEY_LOCAL_MACHINE\SYSTEM\CurrentControlSet\Services\wuauserv" /v "Start" /t REG_DWORD /d "4" /f
net stop WaaSMedicSvc
net stop UsoSvc
net stop wuauserv
sc config wuauserv start= disabled
sc config UsoSvc start= disabled
psexec -i -d -s schtasks /change /tn "Microsoft\Windows\UpdateOrchestrator\Schedule Retry Scan" /disable
psexec -i -d -s schtasks /change /tn "Microsoft\Windows\UpdateOrchestrator\Schedule Scan" /disable
psexec -i -d -s schtasks /change /tn "Microsoft\Windows\UpdateOrchestrator\Backup Scan" /disable
psexec -i -d -s schtasks /change /tn "Microsoft\Windows\UpdateOrchestrator\Schedule Scan Static Task" /disable
psexec -i -d -s schtasks /change /tn "Microsoft\Windows\UpdateOrchestrator\USO_UxBroker" /disable
psexec -i -d -s schtasks /change /tn "Microsoft\Windows\UpdateOrchestrator\Universal Orchestrator Start" /disable
psexec -i -d -s schtasks /change /tn "Microsoft\Windows\UpdateOrchestrator\UpdateModelTask" /disable
psexec -i -d -s schtasks /change /tn "Microsoft\Windows\UpdateOrchestrator\Reboot" /disable
psexec -i -d -s schtasks /change /tn "microsoft\windows\UpdateOrchestrator\Maintenance Install" /disable
psexec -i -d -s schtasks /change /tn "Microsoft\Windows\WindowsUpdate\Scheduled Start" /disable
psexec -i -d -s schtasks /change /tn "Microsoft\Windows\WindowsUpdate\sihpostreboot" /disable
psexec -i -d -s schtasks /change /tn "Microsoft\Windows\WaaSMedic\PerformRemediation" /disable
Note:
- If you find "Update Checker" and "Software update Application" in Task Scheduler , add the following two command lines to the bat file.
- psexec -i -d -s schtasks /change /tn "Update Checker" /disable
- psexec -i -d -s schtasks /change /tn "Software Update Application" /disable
- My Win10 system is 64 bit and I do not encounter the error prompt when running PsExec.exe. But if you come across the error on your 64-bit system, use PsExec64.exe instead of PsExe.exe. Put PsExec64.exe in the folder "SysWoW64" and replace "psexec" with "psexec64" in the command lines above.
Step 2. Create a custom task
- Open "Start" and search for "Task Scheduler". Open it with the administrator account.
- Go to the right "Actions" pane and click on "Enable All Task History".
- Right-click on "Task Scheduler Library" and choose the "New Folder" option.
- Type a name for the folder like "No update permanently". Click on "OK".
- Press the create folder, then right-click on it and select "Create Task".
- On the "General" tab, type a descriptive name for the task in the "Name" field and create a description for the task in the "Description" field.
- In the "Security options" section, click on "Change User or Group" and select one administrator account for running the task. Select "Run whether the user is logged on or not". Check "Run with the highest privileges" and "Hidden". Choose "Windows 10" in the "Configure for" drop-down menu." Click on "OK".
- Go to the "Triggers" tab. Click on "New".
- Select "On an event" in the drop-down menu of "Begin the task".
- Choose "Microsoft-Windows-TaskScheduler/Operational" in the drop-down menu of "Log".
- Enter "140" in the "Event ID" field.
- Click on "OK".
- Go to the "Actions" tab. Click on "New".
- Select "Start a program" in the drop-down menu of "Action".
- In the "Settings" section, click on "Browse" to select your bat file. Click on "OK".
- Go to the "Conditions" tab. In the "Power" section, uncheck "Start the task only if the computer is on AC power". Click on "OK".
- Go to the "Settings" tab. Check the options "Allow task to be run on demand", "Run task as soon as possible after a scheduled start is missed", "Stop the task if it runs longer than", and "If the running task does not end when requested, force it to stop". Define the number of days as you want for "Stop the task if it runs longer than". I prefer to set the parameter value as 3 days. Choose "Do not start a new instance" for "If the task is already running, then the following rule applies". Click on "OK".
- A dialog pops up and asks you for a password. Enter the password of the administrator account you choose to run the task.
- If you did not set a password to the administrator account, you need to disable the policy "Limit local account use of blank passwords to console logon only" in Group policy. Go to "Computer Configuration" -> "Windows Settings" -> "Security Settings" ->" Local Policies" -> "Security Options". Find "Accounts: Limit local account use of blank passwords to console logon only" and double-click on it. Select "Disable" and click on "OK".
Note: It is necessary to enable task history. Because the monitored event logs about the launching of the scheduled tasks related to Windows update will be used to trigger the custom ati-update scheduled task.
After creating the anti-update scheduled task, you can do a test. Enable one scheduled task for Windows update. Click on "Refresh" in the right "Actions" pane or right-click on the blank space and choose "Refresh". You will see the status become "Disabled" immediately.
I've found the .bat file can't keep the settings on Windows update services (Windows Update, Windows Update Medic Service, and Update Orchestrator Service) on my Windows 10 system. Their startup types will be back to "Automatic" and the service states will be back to "Running". I did an online search and found a solution. Try this solution if the .bat file does not work for keeping your settings on your Windows update services.
Open Registry and go to the keys "WaasMediacSVC", "UsoSvc", and "wuauserv" respectively.
- HKEY_LOCAL_MACHINE\SYSTEM\CurrentControlSet\Services\WaaSMedicSvc
- HKEY_LOCAL_MACHINE\SYSTEM\CurrentControlSet\Services\UsoSvc
- HKEY_LOCAL_MACHINE\SYSTEM\CurrentControlSet\Services\wuauserv
Create a string value for each key and name it "WOW64". Set its value data to "dword:0000014c". This value will prevent the services from running even though you manually run the service.
![]()
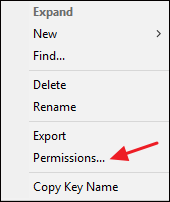
To prevent the startup type to be changed, you can set the "Set Value" permission to "Deny" for each key. Right click on each key and select "Permissions". Click on "Advanced". Press "Add"->"Principal". Type "everyone" in the "Enter the object name to select" box and click on "Check Names". Click on "OK". Now, "Allow" is selected for setting permissions. Make sure no permissions are set to "Allow". Generally speaking, the "Read Control" permission is selected by default. Uncheck the "Read Control" box. Change "Allow" to "Deny" and check the "Set Value" box. Click on "OK" or press the "Enter" key from your keyboard.
Part 7. Remove every user's access to the "Download" folder
In case some version of Win 10 system re-enable Windows update occasionally even though you have set up everything mentioned above, I suggest you remove the write privileges of the "Download" folder under the "SoftwareDistribution" folder. This folder is for Windows 10 system's downloading updates. Once this is done, the Win 10 system will fail to download the updates.
- Browse to the location of the "Download" folder: C:/Windows/SoftwareDistribution.
- Right click on the "Download" folder and select "Properties".
- Go to the "Security" tab and click on "Advanced". Then, click on "Change permissions" in the "Permissions" tab.
- Click on "Disable Inheritance". Choose "Remove all inherited permissions from this object". Click on "Apply".
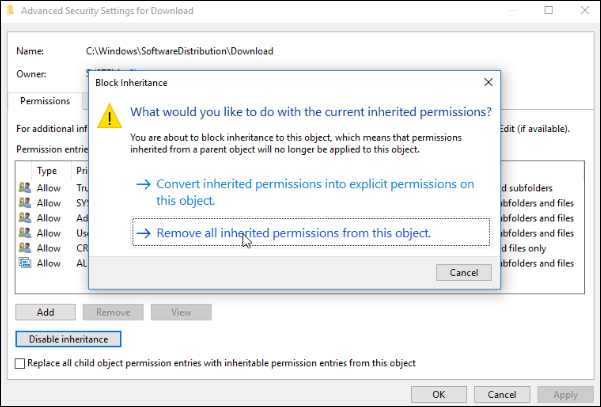
- A prompt dialog will show up, saying "You have denied all users' access to Download. No one will be able to access Download and only the owner will be able to change the permissions. Do you want to continue?". Click on the "Yes" button in the prompt dialog. Then, you will see another prompt dialog, saying You are not about to change the permission settings on system folders. This can reduce the security of your computer and cause users to have problems accessing files. Do you want to continue?". Click on the "Yes" button.
- Click on the "OK" button to close the "Advanced Security Settings" window. Click on the "OK" button again to close the "Properties" window. Try to open the "Download" folder. You should see that a prompt dialog says: "You don't currently have permission to access this folder. Click Continue to permanently get access to this folder". After you click on "Continue", you will see the message "You have been denied permission to access this folder. To get access to this folder, you will need to use the security tab".
It is no exaggeration to say Windows 10 update is a cockroach. It takes effort to disable Windows 10 update thoroughly and stop the automatic updates permanently. There is a video tutorial in Chinese that covers almost all 7 parts of this article. If you speak Chinese, check it out.
Recommended Reading
How to prevent the "off" file being created in the "nginx" folder
How to prevent the ".thumbnails" folder being created in the "DCIM" directory
How to watermark your photos to protect your copyright
Thanks for all the hidden details that microscrap puts into thier crap os. Also, To avoid execution error, please notify to your reader that the .bat must be run as administrator. I didn't get any error this way.
Thanks a lot for your step by steps guidance. Great job!! BTW, if the BAT script stuck in task scheduler running, it may need option -accepteula on psexec.