Sometimes, after you download a song or melody from the site, you may find that the volume of the audio file is too low. It is frustrating to you especially when you are addicted to music. This is when you need to increase the volume of an audio file. I am sure that it will take a lot of time to pick the software tools you like to handle this task. To save your precious time doing so, I will introduce 5 pieces of software to boost audio volume in this article.
#1. Leapic Audio Editor Free

Leapic Audio Editor Free is a piece of professional audio editing application that takes about 10MB space after it is installed onto your Windows system. This app is able to apply a variety of filters as well as many effects to the selected audio part. The accepted input audio formats include MP3, WAV, WMA, OGG, VOX, RAW, and so on. You are also allowed to save the output audio file as the formats mentioned previously. One of the effects is amplifying the audio. To access the amplifying audio function, click on "Effect" on the top of the window and go to "Amplify"->"Amplify". Then, you can set the desired amplifying level by moving a slider or choosing a preset. The presets to increase the audio volume are "3db Boost", "10db Boost", "Amplify 140%", "Amplify 120%", "Amplify 80%" and "Amplify 60%". I would like to mention that Leapic Audio Editor also lets you record audio from input devices.
#2. Audacity
Audacity is an all-in-one multi-track audio editor. It supports importing and exporting WAV, FLAC, M4A, WMA, MP3, AMR, OGG, etc. It has a rich list of effects like noise reduction, fade-in, fade-out, sound amplifying, dynamic range compressing, and audio normalizing.
Click on "Effect" and you will see the "Amplify" option. Choose it and the "Amplify" dialog pops up. In the "Amplification (dB)" section, you can type in a positive value in the input box to make the sound louder. If you type in a negative value, the sound will become quieter. You can also drag the slider to adjust the amount of amplification. In the "New Peak Amplitude (dB) section, you can type in a value in the input box for the new peak amplitude. When you adjust the amplification amount, the new peak amplitude will be updated, and vice versa. There is a "Allow Clipping" box in the "New Peak Amplitude(dB) section. When this box is unchecked, if the amplification value you set makes the new peak amplitude higher than 0 dB, the "OK" button will be inactive, which prevents creating a crunchy sound. If you insist on amplifying the sound even though it will become distorted, check the "Allow Clipping" box. After you apply the amplification, you can listen to the amplified audio to check the result.
By the way, Audacity doubles as an audio recorder that is able to record multiple channels at the same time at high sample rates.
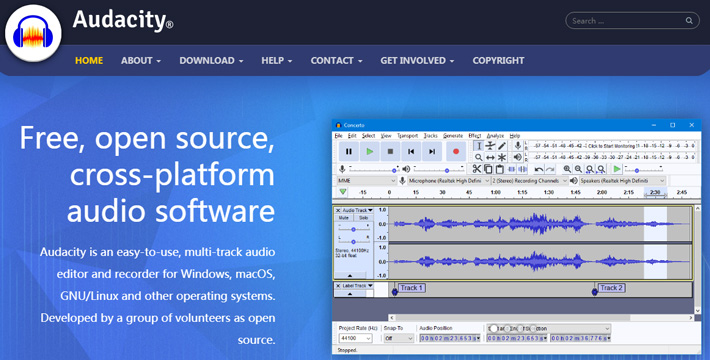
#3. MP3Louder
As the name suggests, MP3Louder is an online tool that is specialized in increasing or decreasing the volume of MP3 files. In other words, you can only tweak the volume level of files in MP3 format. MP3Louder allows you to adjust the volume of only the left channel, only the right channel, or every channel. You can choose how many decibels you need to specify the amount of amplification. The amplifying process is very fast and takes only a few seconds.
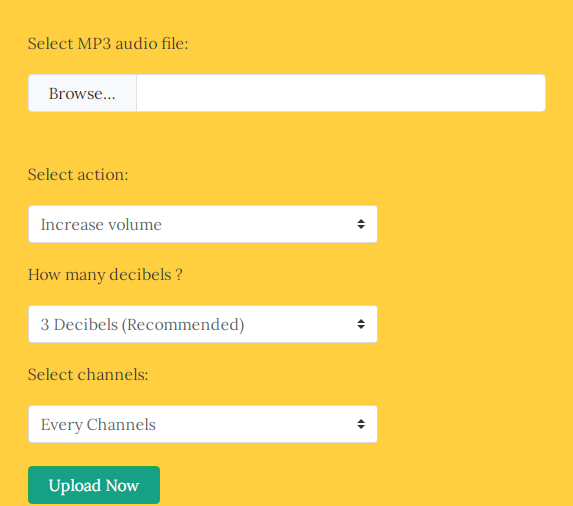
#4. Audio Amplifier Free
Audio Amplifier Free is an intuitive application that is able to increase or decrease the volume of video and audio files. It supports a lot of media formats including MP3, WAV, AC3, MOV, AVI, MP4, 3GP, VOB, to name a few. This app is very easy to use. After launching the program, you will be greeted with a simple window. Press "Load Audio or Video File" to import your audio file into the program. Then, rotate the command dial or click on the left arrow and right arrow to set the amplification level. Finally, press "Amplify" to apply changes and select the output location to export the changed audio file. The downside of Audio Amplifier Free is that it does not let you listen to the amplified audio to check its quality before you export it. Audio Amplifier Free lacks the batch processing ability. If you need batch conversion, try Audio Amplifier Pro.
#5. FFmpeg
FFmpeg is a handy command-line tool that is normally used to convert videos and audios by command prompt enthusiasts. This utility can also be leveraged to amplify the sound of audio files. It takes time for inexperienced users to figure out how to increase the audio volume using FFmpeg. Follow my step-to-step tutorial below if you have no clue about how to use it to increase the volume level.
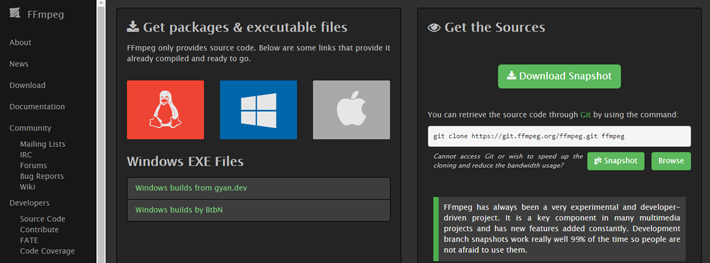
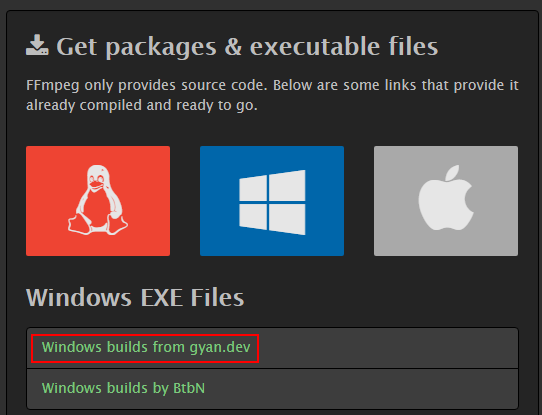
- Head over to the download webpage. Scroll down and hover your mouse cursor over the "Windows" option. Click on "Windows builds from gyan.dev".
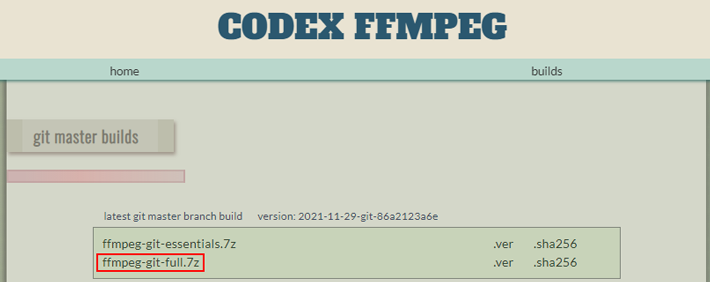
- You will be taken to a new webpage. Click on "ffmeg-git-full.7z" and an archive will be downloaded to your computer.
- Open the archive. Enter the top-level folder-> the "Bin" folder and extract ffmpeg.exe to a folder. ffmeg.exe is the executive file you are going to use to amplify the sound.
- Put the audio file in the folder where the ffmpeg.exe is extracted. In the folder where the audio file and ffmpeg is placed, press the "Shift" key on your keyboard, hold down it and right-click on the empty space in the folder. Then, choose "Open command window here" in the context menu. The CMD window will appear. As you can see, you have entered the folder in the CMD window.
![]()
- I would like to teach you another way to enter a folder in the CMD window. Press the "Windows" key, hold down it, and press the "R" key. This will open the "Run" dialog. Type in "cmd" in the "Open" box of the "Run" dialog and click on "OK" to open the CMD window. Type in cd /d and the path of the folder like cd /d E:\Program Files (x86)\ffmpeg.

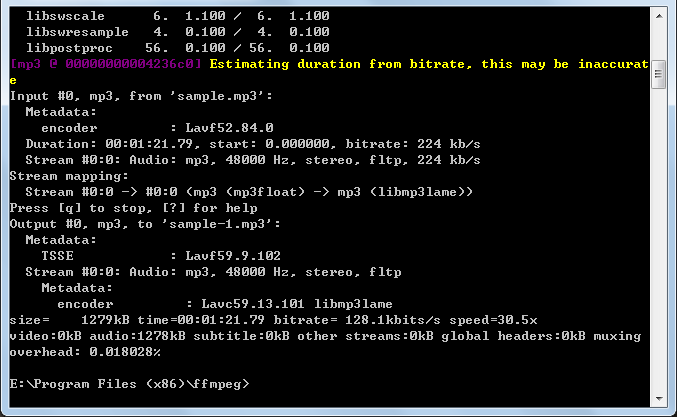
- Now, use the command syntax "ffmpeg -i input.mp3 -af "volume=ndB" output.mp3" to amplify the sound. "input.mp3" refers to the name of the input file. "output.mp3" refers to the name of the output file. Please note that the file name should contain no spaces and include the file extension. "ndB" refers to the number of decibels you want to increase and "n" should be any positive integer. For example, you can type in ffmpeg -i sample.mp3 -af "volume=10dB" sample-1.mp3 in the CMD window.

- Press the "Enter" key to start processing the amplification. When the amplification process is done, the converted file will appear in the folder where the source file is located.
- You may feel inconvenient to put the audio file in the same folder as ffmpeg.exe each time you want to amplify the sound of the file. As a matter of fact, you can save this step by adding the path of the folder containing ffmpeg.exe to the path variable.
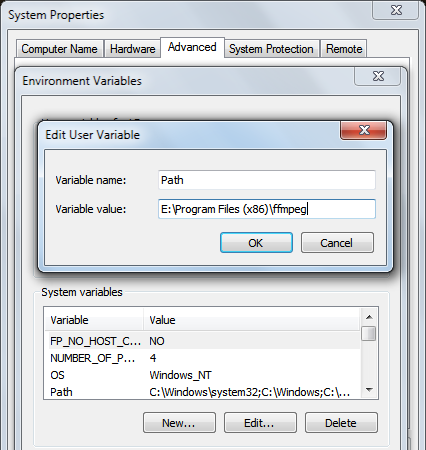
- Right-click on the "Computer" or "This PC" icon on the desktop and choose "Properties". Choose "Advanced system settings" in the "System Properties" window to bring up the "System Properties" dialog. Go to the "Advanced" tab and click on "Environment Variables". There are two kinds of variables in the "Environment Variables" dialog. One is the user variable that is only valid for the current user account. The other one is the system variable that is valid for any user account. Let's say, you choose the user variable. Click on the "New" button in the "User variables" section to open the "Edit User Variable" dialog. Type in words in the "Variable name" field like "Path". Copy and paste the path (eg. E:\Program Files (x86)\ffmpeg) of the folder into the "Variable name" field. Click on "OK" to close the dialog. Click on the "OK" button in the "Environment Variables" dialog to apply the changes.
- After you finish setting the path variable, launch the CMD window and type in FFMPEG. If the folder path is added properly to the path variable, the CMD window will display the details about FFmpeg. Then, use either one of the two ways shown previously to enter the folder containing the audio file in the CMD window and use the syntax to perform the conversion.
Conclusion
Last year, I downloaded the video "Rhythm of Four Seasons", the ED of episode 2 of "Fog Hill of Five Elements" and converted it to MP3 format. I found the sound was not loud enough. Then, I used Audio Amplifier Free to raise its volume. Perhaps you are in the same situation as I was in before. This is when you should increase the volume of your music file using any one of the 5 audio volume boosters mentioned in this article. Please tell me which one you like in the comment section below.
Recommended Reading
Fast convert video formats with a video editor for newbies
3 online audio converters to help you get the desired format