It is common that sometimes you need to add annotations to an image. You are writing a guide to instruct users how to use an app and want to point out the panel users should navigate to in a screenshot. You've taken some photos of scenic spots on your trip and want to share them with your friends. You would like to mark a famous building in the photo. You want your colleagues to tune some colors of an image and need to label the particular parts of the image to be touched up. In this article, I will show you four ways to annotate an image.
Way 1. Use Photoshop to annotate your image
Photoshop is a must-have tool for graphic designers that offers an insanely number of functions to edit images. You can add text notes in your image using Photoshop and save the image as a PSD format to tell your co-worker your requirements for modifying the image.
- Throw your image in Photoshop.
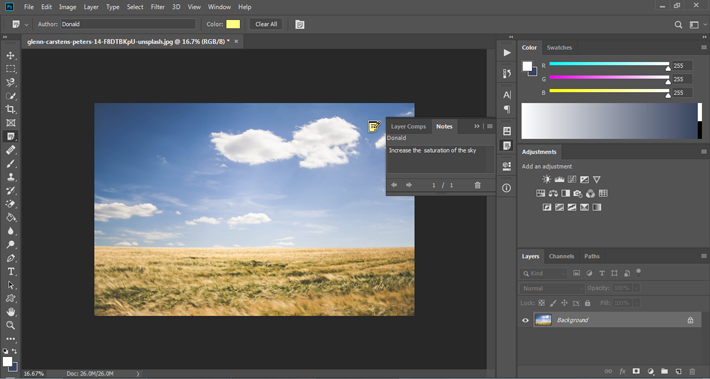
- Go to the left toolbar and right-click on "Eyedropper Tool" and choose "Note Tool".
- The property bar of "Note Tool" will appear on the top of Photoshop. You can pick one color as the color of the note.
- Move your mouse cursor to the position where you want to add the note and click on the image. The "Notes" panel will show up. Enter words in the input field. If you want to add your name to the note as the author name, go to the property bar and type in your name in the "Author" box.
- Save your image as a PSD file.
Way 2. Use Szoter to annotate your image
Szoter is an online tool that allows you to annotate your image by adding text and drawing shapes including circle, rectangle, arrow, and line. I like this app very much because of its ease of use and free service.
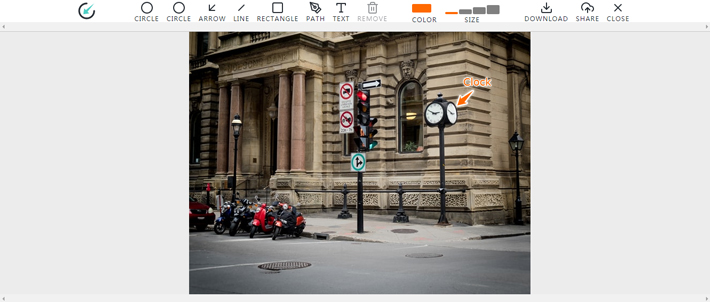
- Head over to the site. Press the "LAUNCH EDITOR V2" button and you will be greeted by an editor.
- Import your image from disk, URL, or clipboard.
- Choose one shape on the top menu bar and draw it on the image. Adjust the color and thickness of the arrow, circle line, or rectangle frames. Choose "TEXT" on the menu bar. Click on the image and move the text to the right position. Double-click on the text, edit the text in the text box, and click on somewhere outside the text box to finish the editing. Tweak the size and color of the text. If you want to delete the text or the shape, click on it and choose "Remove".
- Press the "Download" button to download the changed image to your computer.
Way 3. Use Vertexshare Photo Stitcher to annotate your image
As the name suggests, Vertexshare Photo Stitcher is a piece of professional software for combining images into a collage. Besides stitching images, it also offers several basic editing tools to touch up your image. You can use some tools to add annotations to any part of your image.
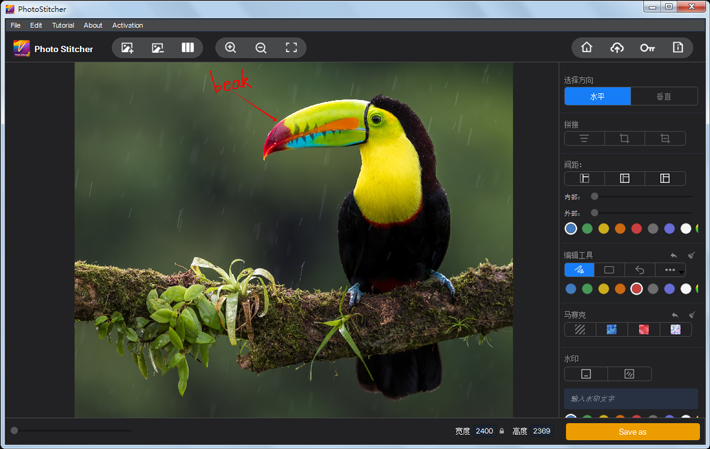
- Throw your image into the program. Perhaps the image has very large dimensions and does not fit the preview panel. You can drag the zooming slider and pan the image or click on "Edit"->"Fit Screen" to make the image fit the preview panel. If your image is a vertical image, to make it fit the preview panel, you also need to change the default horizontal direction to vertical direction. Go to the "PICK DIRECTION" section in the right-hand tool panel and choose "VERTICAL".
- Go to the "EDITING TOOLS" section in the right-hand tool panel. There are three tools. First, use the "Rectangle" tool or the "Arrow" tool to point out the object in the image. Let's say, you want to draw an arrow. Choose the "Arrow" tool. Click on the ellipse button to specify the size of the arrow by selecting "Thin", "Medium", or "Thick". Pick one color on the palette as the color of the arrow. Draw an arrow on the image pointing to the object. Second, choose the "Free Hand Lines" tool. Set the size and color for the lines you will draw in the same way you did for the arrow. Draw free hand lines to write words on the image beside one end of the arrow. If you are not satisfied with the result, you can undo the actions one by one by clicking on the "Undo" button or clear all shapes by clicking on the "Clear" button.
- Press the "Save as" button to export the changed image.
Way 4. Use the "Shapes" function to annotate your image in Microsoft Word
When writing in Word, you may want to add annotations to inserted images. I will show you how to annotate an inserted image using the "Shapes" function in Microsoft Word 2007.
- Go to the "Insert" tab and click on "Shapes". Go to the "Callouts" section in the drop-down menu and select a callout you like. I suggest you select the rounded rectangular callout.
- Your mouse cursor changes to the "+" symbol. Click on the image, hold down the mouse button, and drag to create the callout. Adjust the size of the callout and move the callout to the appropriate position.
- You may want to reposition the callout arrow. Move your mouse cursor over the yellow lozenge handle. Click on it, hold down the mouse button, and drag until the callout arrow points where you need.
- You can fill the callout with the color you want and customize the color of its outline in the "Format" tab. Click on the "Fill" option and select the filling color. Click on "Outline" and select one color for the outline.
- Enter the text in the callout. You can change the font size, font, and color of the text.
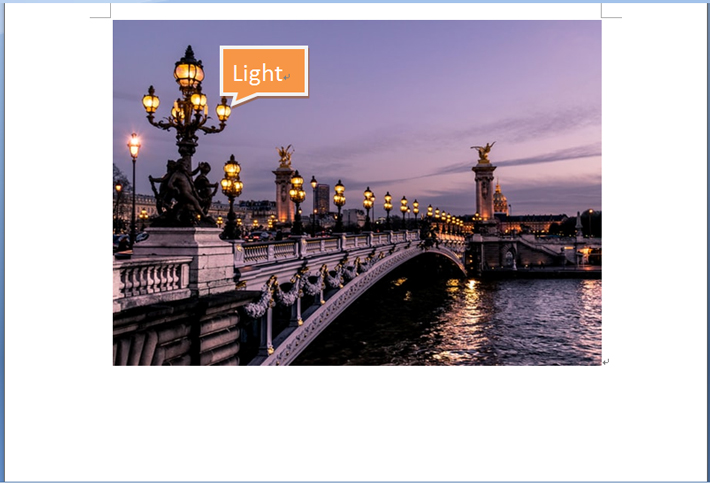
- You can also add annotations by adding arrows and text boxes. Click on "Shapes" and choose an arrow in the "Insert" tab. Click on "Text box" in the "Insert" tab and choose "Draw text box". Draw a text box on the image. Type in words in the text box. Adjust the size and color for the text box and arrow in the same way you did for the callout.
![]()
- Don't forget to save the Word file.
Conclusion
People inevitably need to annotate their pictures, screenshots, and photographs. I list several ways to add image annotations in this article. I am sure you will master how to annotate an image after reading this article. If you like this tutorial, share it with your friends.